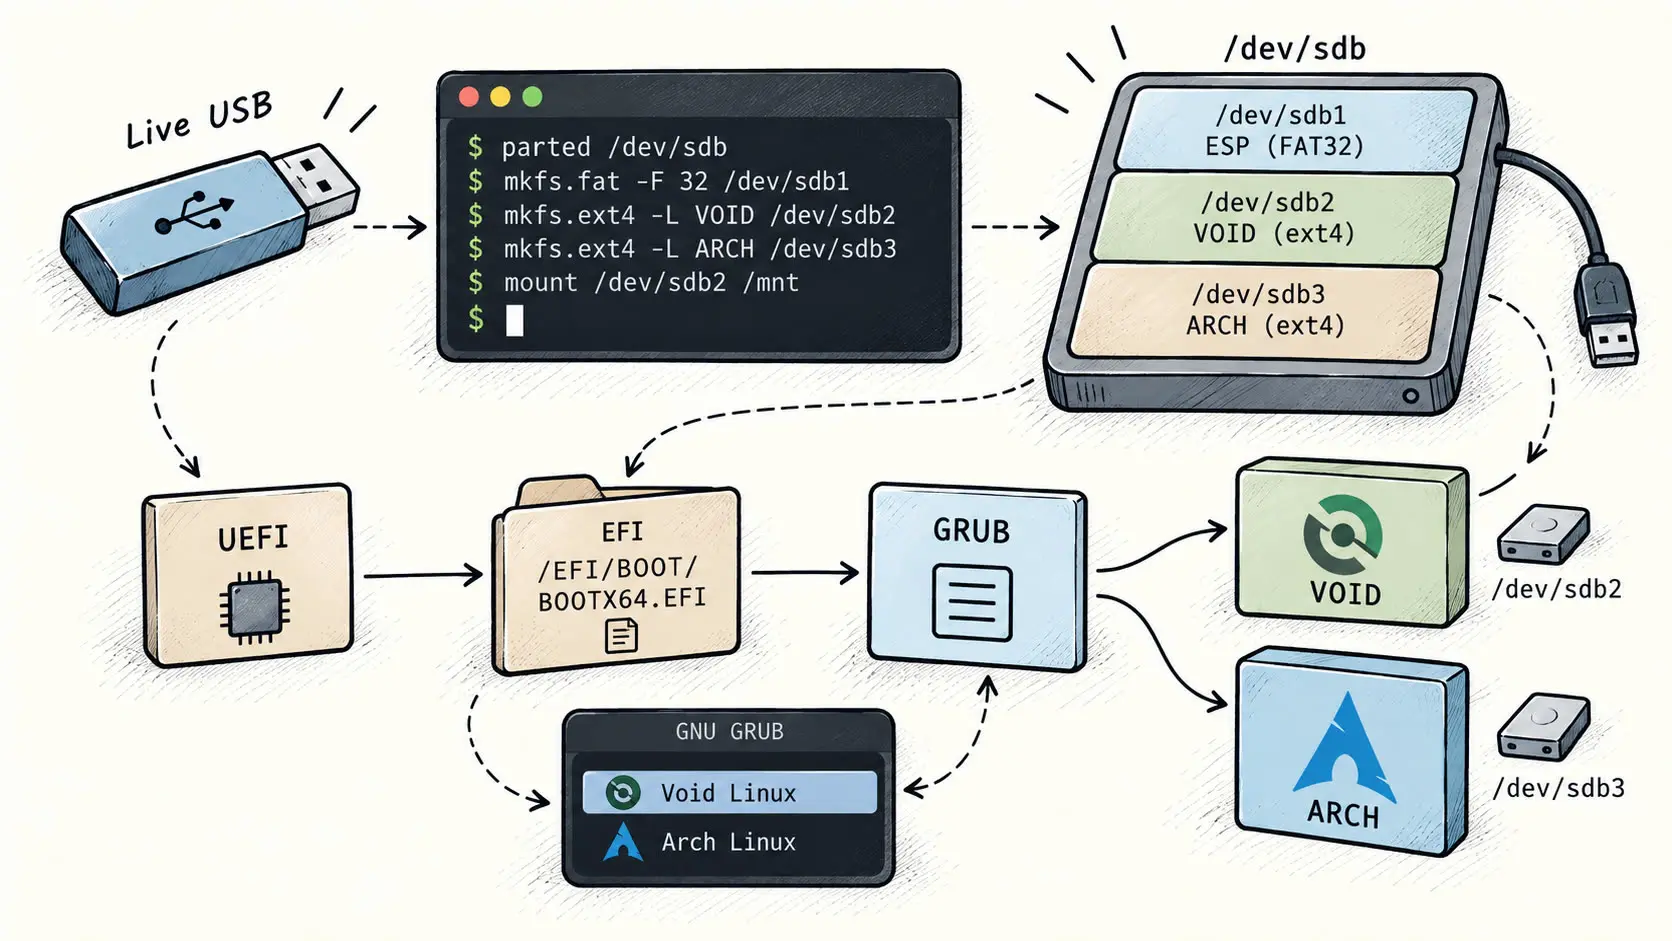
In this article, we'll deep dive into the manual installation of multi-distrributions in one disk.
The Setup
We'll install Arch And Void Linux on the same disk.
In this case that's an external hard-drive that we'll plug into a computer through USB.
So, we'll download the ISOs, wether each one on a separate USB stick or use Ventoy to install the 2 ISOs on the same USB stick.
Targeting the hard-drive
First, we boot into the Void live environment, here all is oaded into the RAM.
So we first need to identify the hard-drive we'll install the 2 distribution into.
We run:
lsblk -o NAME,SIZE,TYPE,MOUNTPOINTS,PARTUUID,PARTLABEL,LABEL,MODEL,VENDOR,SERIAL,TRAN
Output:
NAME SIZE TYPE MOUNTPOINTS PARTUUID PARTLABEL LABEL MODEL VENDOR SERIAL TRAN
sda 447.1G disk Samsung SSD 870 EVO 500GB ATA S6PXXXXXXXXX sata
|-sda1 100M part 174a0abe-1272-fa44-b63f-411ad529cc20
|-sda2 447G part 60e9a40e-a90f-974e-af3c-7235b7e5d05f root
sdb 465.8G disk TOSHIBA MQ04UBF500 TOSHIBA 12XXXXXXXXXX usb
|-sdb1 512M part a1b2c3d4-1111-2222-3333-444444444444 EFI System Partition ESP
|-sdb2 465.3G part b2c3d4e5-1111-2222-3333-444444444444 MINT MINT
nvme0n1 931.5G disk Samsung SSD 980 PRO 1TB S5GXXXXXXXXX nvme
|-nvme0n1p1 513.1M part /boot/efi 819733c4-e61a-422c-aa86-f66d0f53aa60 EFI System Partition
|-nvme0n1p2 931G part / b9560819-c4cd-4cb0-ad55-edf17b702939
nvme1n1 465.8G disk CT500P3SSD8 234XXXXXXXXX nvme
|-nvme1n1p1 465G part 7ffb20c7-af9a-4692-88f1-446c4cccb736 Basic data partition
|-nvme1n1p2 779M part 3b3e11c5-fe80-4e31-b148-e8240b908445
Here, I know that the only disk which is manufactured by Toshiba is the one I've just plugged and it's 500GB.
It therefore corresponds to /dev/sdb.
There is an installation of Linux Mint on it that we'll wipeout with tha partitioning and the formating.
-
UUID-> the unique identifier of a file system (ext4,fat32...) (not probbed here) -
LABEL-> the name associated to a file system -
PARTUUID-> the unique identifier of a partition -
PARTLABEL-> the name associated to a partition
Installing Void
First, we need to delimit 3 things:
ESP
The EFI System Partition, or ESP, is the partition from which UEFI firmware can load boot programs.
In this article, we will use the UEFI boot standard rather than legacy BIOS.
With legacy BIOS, the firmware normally executes boot code stored in the first sector of the selected disk. That code then loads a more capable bootloader, such as GRUB.
Legacy BIOS does not itself understand operating systems, although GRUB can still present a menu containing multiple distributions installed on the same physical disk.
UEFI uses a more structured approach.
Indeed, EFI boot entries stored in the computer’s NVRAM (permanant memory) associate a human-readable name with the location of an EFI executable:
For example:
Void - external disk - ESP - \EFI\Void\grubx64.efi
The firmware launches the selected EFI executable. That executable—GRUB in our case—then reads its configuration and presents the available operating systems.
For removable media, UEFI also defines a standard fallback executable located on the storage device being booted:
\EFI\BOOT\BOOTX64.EFI
This file is stored on a special partition of the device designated as an EFI System Partition (ESP).
The ESP is formated as a FAT32 filesystem, because a lot of firmware understand this file-system (convention).
When booting the device, the firmware can load this executable without requiring a dedicated NVRAM entry for that particular disk.
This makes the disk portable: another UEFI computer can boot it through the fallback path even though that computer has no NVRAM entry pointing to the disk’s bootloader.
Creating the partitions
We will create all 3 partitions /dev/sdb1, /dev/sdb2 and /dev/sdb3 in one command:
parted /dev/sdb --script \
mklabel gpt \
mkpart ESP fat32 1MiB 513MiB \
set 1 esp on \
mkpart VOID ext4 513MiB 50% \
mkpart ARCH ext4 50% 100%
This produces:
/dev/sdb1 PARTLABEL=ESP
/dev/sdb2 PARTLABEL=VOID
/dev/sdb3 PARTLABEL=ARCH
We begin the partitions at 1MiB to have a better aligment.
Also, the synthax for the memory interval includes the lower bound and exclude the upper bound.
The:
set 1 esp on
Declares /dev/sdb1 as the ESP partition, so the firmware knows that it has to read this one as the ESP partition.
Creating the filesysems - Formatting
We'll format the ESP partition as a FAT32 filesystem:
mkfs.fat -F 32 -n ESP /dev/sdb1
Here the -n creates the LABEL (name of the filesystem), here it's set to "ESP".
Now, we'll format the other partitions:
mkfs.ext4 -L VOID /dev/sdb2
mkfs.ext4 -L ARCH /dev/sdb3
-L is to mkfs.ext4 what is -n to mkfs.fat.
Mounting the partiitons for VOID
Now, we need to mount /dev/sdb2 into the live environment, where Void will be installed:
mount /dev/sdb2 /mnt
And also the ESP partition:
mkdir -p /mnt/boot/efi
mount /dev/sdb1 /mnt/boot/efi
We can verify the mounting with:
findmnt /mnt
findmnt /mnt/boot/efi
Installing base Void System
Now, from the live environment we'll run the xbps-install targeting the /mnt environment to install the base packages necessary to a Void system.
First, we set a custom variable holding the repository URL and another holding the targeted architecture for the packages.
REPO=https://repo-default.voidlinux.org/current
ARCH=x86_64
The x86_64 will compile with the glibc library, for the musl one we would use:
x86_64-musl
glibc (GNU impl) and musl are two implementations of the C standard library (libc), a foundational component that provides applications with common functions for memory allocation, file operations, networking, threads, character handling, locales, and access to Linux system calls.
Most general-purpose distributions—including Debian, Ubuntu, Fedora, Arch and the standard edition of Void use the feature-rich and widely compatible glibc, whereas Alpine and the x86_64-musl edition of Void use the smaller and simpler musl.
We also need to copy the repository signing keys from the live to the targeted permanant environment:
mkdir -p /mnt/var/db/xbps/keys
cp /var/db/xbps/keys/* /mnt/var/db/xbps/keys/
And finally we are abble to run the following command:
XBPS_ARCH="$ARCH" xbps-install \
-S \
-r /mnt \
-R "$REPO" \
base-system \
grub-x86_64-efi
At this point, you should be connected through an ethernet cable or have enabled your Wi-Fi interface, more on that here: https://julienlargetpiet.tech/articles/i-just-wanted-wi-fi-to-work-on-linux.html.
xbps-install needs the variable XBPS_ARCH containing the value of the targeted architecture, so we also could have done this in 2 commands, first exporting the variable for all the programms and then run the xbps-install command so it can see the variable, but I prefere the first one because it's more specific to the command.
So the less specific variant is:
export XBPS_ARCH="$ARCH"
xbps-install \
-S \
-r /mnt \
-R "$REPO" \
base-system \
grub-x86_64-efi
-
-r /mnt-> treat /mnt as the target root; -
-R "$REPO"-> use this repository; -
base-system-> install Void’s fundamental system; -
grub-x86_64-efi-> install GRUB for x86-64 UEFI.
Setting /etc/fstab
For that we'll use xgenfstab which is part of Void native tools, it comes from xtools package (normally preinstalled in the live).
As you may know the /etc/fstab is a userspace configuration file used by the init/service system and mount utilities to know what additional filesystems should be mounted.
We'll see that the GRUB already contains information about which partition to mount as the root filesystem.
In the grub configuration file, we will able to see this for example:
linux /boot/vmlinuz-linux root=UUID=ARCH_UUID rw
Where ARCH_UUID is the filesystem Id containing the root filesystem.
This is a command line that the kernel will interpret.
On the PC I am writing the article I can even see the command that was passed from GRUB to the kernel here:
cat /proc/cmdline
Output:
BOOT_IMAGE=/boot/vmlinuz-7.0.0-28-generic root=UUID=693c6075-7944-4235-84ef-29bb8dcd9aef ro quiet splash
Therefore, yes: GRUB does pass the root filesystem’s UUID to the kernel.
But it only passes the particular information explicitly written in the kernel command line.
It does not automatically pass a complete filesystem layout.
So what /etc/fstab adds ?
Imagine I have this /etc/fstab:
# <file system> <mount point> <type> <options> <dump> <pass>
UUID=ARCH_UUID / ext4 rw,relatime 0 1
UUID=ESP_UUID /boot/efi vfat umask=0077 0 2
The GRUB kernel command line only provides:
root=UUID=ARCH_UUID rw
That is sufficient to identify the initial root filesystem, but it does not say:
-
that the ESP should be mounted at /boot/efi
-
which filesystem options the ESP and root should use
-
If a swap partition exists
-
whether a separate partition for
/homeexists
For example, the relatime option.
It concerns a file's access time, called atime.
Linux files commonly have timestamps such as:
mtime= last modification of file contentsctime= last metadata changeatime= last time the file was read
Historically, with strictatime, merely reading a file could cause a disk write to update atime.
For example:
cat foo.txt
could result in:
-
update
foo.txt'satime -
write metadata back to disk
That's potentially a lot of unnecessary writes.
relatime is a compromise discipline. Linux updates atime only when it is useful, roughly when:
atime < mtime
or
atime < ctime
or the existing atime is sufficiently old, typically more than 24 hours.
Now, umask=0077 for the EFI partition is a little special.
umask is a mask that removes permission bits.
Because FAT32 cannot store Unix file-permission metadata, Linux synthesizes permissions when the filesystem is mounted. Roughly:
files 0666 & ~0077 = 0600
directories 0777 & ~0077 = 0700
The important point is that the mask operates bitwise:
final_permissions = original_permissions & ~mask
For example, for the group bits:
original: 110 = rw-
mask: 111 = rwx
~mask: 000
They invert the bits of the mask, because the latter represent bits to remove, so for the actualimplementation we need ~mask.
Therefore, we have:
110 & 000 = 000
So 0077 removes all permission bits from group and others, while leaving the owner's permissions untouched.
We can also specify separate masks for files and directories. For example:
fmask=0177,dmask=0077
which gives:
files 0666 & ~0177 = 0600
directories 0777 & ~0077 = 0700
So, back to xgenfstab, the command we'll use is:
xgenfstab -U /mnt > /mnt/etc/fstab
The xgenfstab -U /mnt command should generate this output:
UUID=VOID_UUID / ext4 defaults 0 1
UUID=ESP_UUID /boot/efi vfat defaults 0 2
Indeed, here the /dev/sdb2 is mounted and corresponds to / (from /mnt POV) while /dev/sdb1 is also mounted and corresponds to /boot/efi (also from /mnt POV).
The -U flag is used to tell to use the UUID instead of the partition name such as /dev/sdb1.
The fifth field is the dump field.
dump is an old utility for partitions backup.
dump could read the /etc/fstab file and see wether a partition is a candidate to the dump command (0 -> no, 1 -> yes).
Nowadays, most Linux distributions do not use dump at all, this is why it's almost alsways set to 0.
The sixth field is the field named pass.
This tells fsck (filesystem check utility) in chich order the filesystems should be checked at boot.
Typical values are:
-
0-> don't automatically check this filesystem -
1-> check first -
2-> check after filesystems withpass=1
Preparing the Void environment
So after installing base system, we have to mount the base directories, so it includes /dev, /proc, /sys and /run.
We mount them because the next commands we'll run such as grub-install expects a normal Linux environment to run (for example firmware informations exposed through /sys...)
We mount them with the --rbind option because sub-directories in each one of the mount source can themselves being mount point, so we have to recursively mount all the sources ?
therefore the command is:
mount --rbind /dev /mnt/dev
mount --rbind /proc /mnt/proc
mount --rbind /sys /mnt/sys
mount --rbind /run /mnt/run
We then mark these recursively bind-mounted trees as slave:
mount --make-rslave /mnt/dev
mount --make-rslave /mnt/proc
mount --make-rslave /mnt/sys
mount --make-rslave /mnt/run
This has nothing to do with ordinary file modifications, but with mount events.
A mount event simply means that a filesystem is mounted or unmounted somewhere inside one of these directory trees.
For example, after:
mount --rbind /dev /mnt/dev
mount --make-rslave /mnt/dev
we can still enter the chroot and mount another filesystem somewhere below /dev:
mount something /dev/usb
That mount is perfectly valid inside the chroot.
The important point is that, because /mnt/dev is marked as slave, this new mount does not propagate back into the live system's original /dev mount tree.
Conceptually:
live system
/dev
|
| --rbind
V
/mnt/dev
chroot
After --make-rslave:
mount created in live system
|
V
may propagate into chroot
mount created in chroot
|
X
does not propagate back
to the live system
So --make-rslave does not prevent mounting filesystems inside the chroot.
It only controls the direction in which future mount and unmount events are propagated between the two mount trees.
The purpose is therefore to isolate the mount structure, not the files themselves.
And after that, we can finally chroot into the system (and use bash in it):
chroot /mnt /bin/bash
That's all the commands the chroot wrapper for Void named xchroot do underneath, because we can simply do:
xchroot /mnt /bin/bash
Configuring the Void system
Now we'll create a bunch of configuration files withing /etc which is the convention directory for the Linux system configurations (where all packages read system configurations, user-specific configurations are written into the ~/.config folder, like the ~/.config/nvim/init.vim file for NeoVim for example).
So, here we can configure the hostname, just writing its name into /etc/hostname.
We can also set the /etc/hosts file that's helpfull for programms trying to resolve the machine's name.
It can look like:
127.0.0.1 localhost
::1 localhost
127.0.1.1 void-usb.localdomain void-usb
The hostname will be applied during the real boot. Changing the file inside the chroot does not necessarily change the live ISO’s currently active hostname.
Now, for the locales: timezone, keyboard layout, locales....
Void exposes general settings in /etc/rc.conf, you can modify (using pre-installed text editor nano) the timezone for example to:
TIMEZONE="Europe/Paris"
HARDWARECLOCK="UTC"
Btw, at this point, if you prefere Neovim as your text-editor, install it with xbps-install which is the package manager on Void:
xbps-install -S neovim
But you can also do it in the more native Linux way creating a symlink between the /usr/share/zoneinfo/Europe/Paris file and the /etc/localtime.
Indeed, the /usr/share directory contains architecture-independent data installed by programms, for example:
/usr/share/man/ man pages
/usr/share/doc/ documentation
/usr/share/icons/ icon themes
/usr/share/fonts/ fonts
/usr/share/locale/ translations
/usr/share/applications/ desktop .desktop files
/usr/share/mime/ MIME type data
/usr/share/zoneinfo/ timezone database
/usr/share/examples/ example configuration files
The command is:
ln -sf /usr/share/zoneinfo/Europe/Paris /etc/localtime
The -s flag is for symlink, instead of defaulting to a hardlink, which makes both files the same (because have the same inode, instead of a symlink that have its own little filesystem object with its own inode).
An inode is the filesystem structure that stores the metadata of a file, but not its filename.
Conceptually, a directory contains mappings like:
filename -> inode number
and the inode contains things such as:
-
file type
-
permissions
-
owner UID
-
group GID
-
file size
-
timestamps
-
link count
-
pointers to the file's data blocks
We can inspect inode numbers with ls -li, for example:
12345 -rw-r--r-- 2 user user 100 Sep 3 fileA
12345 -rw-r--r-- 2 user user 100 Sep 3 fileB
In this case, fileA and fileB have the same inode number, so they are hard-linked.
In this case, a symlink is preferable to a hardlink, because we can do:
readlink /etc/localtime
Output:
/usr/share/zoneinfo/Europe/Paris
Now, the -f (force) flag is necessary when the destination file exists, for example:
ln -s src dst
may fail with:
ln: failed to create symbolic link 'dst': File exists
But:
ln -sf src dst
roughly means:
if dst exists:
remove it
create the new symlink
Because, the ln -s src dst will write its proper file (own filesystem object) with the same name as dst in its filepath, and a directory can't have 2 filenames with identical names (dst and dst in the example), so it must first remove the old one.
So, now we can read the symlink we've just created:
readlink -f /etc/localtime
Output:
/usr/share/zoneinfo/Europe/Paris
The -f option shows the final resolved absolute path, because the target (source) of a symlink can itself be stored as a relative path.
For example:
ln -sf ../pathB/fileB pathA/fileA
creates:
pathA/fileA -> ../pathB/fileB
The relative target ../pathB/fileB is resolved relative to the directory containing the symlink, here pathA/.
In this case it's not the case, but we prefere to always normalize the output as absolute path with the -f flag.
Okok, back to configurations now:
We also synchronize the hardware clock with the current Linux system clock:
hwclock --systohc
A computer actually has two relevant clocks:
-
system clock-> maintained by the Linux kernel while the system is running -
hardware clock/ RTC -> battery-backed clock that continues running while the computer is powered off
The --systohc option means system-to-hardware-clock:
system clock
|
V
hardware clock
When Linux boots, the usual sequence is roughly:
Hardware clock (RTC)
|
| Linux reads it during boot
V
Kernel system clock
|
| optionally corrected later by NTP
V
More accurate system clock
So if the RTC already contains a reasonably correct time, Linux can initialize its system clock from it without any Internet connection.
Internet access becomes useful for NTP (Network Time Protocol). NTP lets Linux ask external time servers what the actual current time is and correct any drift.
The reverse operation also exists:
hwclock --hctosys
which initializes the system clock from the hardware clock.
Linux systems normally keep the hardware clock in UTC. The timezone configured through /etc/localtime is then used to convert UTC into the local civil time displayed to the user.
For example, during summer in Paris:
hardware/system UTC time: 12:00
|
| Europe/Paris = UTC+2
V
displayed local time: 14:00
hwclock is a userspace utility around the Linux RTC interface. The hardware clock is exposed by the kernel through devices such as /dev/rtc0, so we could theoretically write a program that communicates with the RTC device directly, but hwclock provides the standard convenient interface for doing so.
Now, the keyboard layout is also something you can modify in /etc/rc.conf, for example:
KEYMAP="fr"
In a systemd based distribution like Arch Linux, this is done in the /etc/vconsole.conf file with the same synthax.
Now, the locale which controls:
-
program-message language
-
date formatting
-
decimal separators
-
sorting rules
-
character encoding
This procedure applies to a Void glibc installation. A Void musl installation handles locales differently.
Locale configuration differs because locale processing is implemented largely by the C library:
-
glibcprovides extensive language-specific formatting, sorting and translation data that must first be generated, -
muslhas more limited localization support and does not useglibc’s locale-generation system.
Therefore, a Void glibc installation uses glibc-locales and xbps-reconfigure -f glibc-locales, while a Void musl installation generally selects an existing UTF-8 locale such as C.UTF-8 without generating glibc locale data.
On a glibc based distributions, we ca see the generated locales with:
locale -a
For example, on my Debian PC, I get:
C
C.utf8
en_AG
en_AG.utf8
en_AU.utf8
en_BW.utf8
en_CA.utf8
en_DK.utf8
en_GB.utf8
en_HK.utf8
en_IE.utf8
en_IL
en_IL.utf8
en_IN
en_IN.utf8
en_NG
en_NG.utf8
en_NZ.utf8
en_PH.utf8
en_SG.utf8
en_US.utf8
en_ZA.utf8
en_ZM
en_ZM.utf8
en_ZW.utf8
fr_BE.utf8
fr_CA.utf8
fr_CH.utf8
fr_FR.utf8
fr_LU.utf8
POSIX
So, to have the fr_FR.UTF-8 UTF-8 locale, I uncommented the latter in /etc/default/libc-locales.
Btw, /etc/default/libc-locales is Void specific, for example in debian, the same file is named /etc/locale.gen.
And then, we can write the one that will be used by applications into /etc/locale.conf:
printf '%s\n' 'LANG=fr_FR.UTF-8' > /etc/locale.conf
And generate the compiled locale data that glibc can load:
xbps-reconfigure -f glibc-locales
On a musl system, we usually simply do (we generate nothing first):
printf '%s\n' 'LANG=C.UTF-8' > /etc/locale.conf
C.UTF-8 is a simple choice for predictability.
It combines the culturally neutral behavior of the C locale and the UTF-8 character encoding.
Now, we have to set the root password:
passwd
That prompts you:
New password:
Retype new password:
We can also create a user:
useradd -m -G wheel,network -s /bin/bash juju
-
-m-> creates/home/juju -
-G wheel,network-> add the user to supplementary groups -
wheel-> permits administrative (sudo) access once sudo is configured (see later) -
network-> allowsNetworkManageraccess according to Void’s configuration -
-s /bin/bash-> use Bash as the login shell -
juju-> account name
Now we set its password:
passwd juju
We can verify the groups juju belongs to:
id juju
In the output, we can now see the group field with:
groups=wheel,network
Now, we can configure sudo.
We have to edit the /etc/sudoers file.
We made juju belongs to the wheel group, its name is just a convention, for example on Debian, the name of the group configuring sudo access is named sudo.
So, open this file and add:
%wheel ALL=(ALL:ALL) ALL
-
%wheel-> users belonging to thewheelgroup -
first
ALL-> on all hosts (heritage of the old days where several terminals could be connected to one server) -
(ALL:ALL)-> allowed to run commands (declared in the lastALL) as any user and any group -
last
ALL-> all commands
Now, we can check the synthax with:
visudo -c -f /etc/sudoers
-c is for check and -f for precising the file.
We could also have run the visudo command which opens a text-editor and validate synthax before allowing to save the file (basically a wrapper arround the last commands).
Now, we can install NetworkManager which is service that make it easier to control and configure network interfaces.
More on this one in this article https://julienlargetpiet.tech/articles/i-just-wanted-wi-fi-to-work-on-linux.html
It includes its cli nmcli.
xbps-install -S NetworkManager
This service need the D-Bus service (between nmcli and the background NetworkManager daemon).
D-Bus is a standard communication channel that allows Linux programs and services to call each other, send signals, and exchange information.
In Void that uses runit, not systemd, we activate services by creating a symlink from /etc/sv/SERVICE to /var/service/.
Therefore, we enable D-Bus with:
ln -s /etc/sv/dbus /var/service/
which is interpreted as:
ln -s /etc/sv/dbus /var/service/dbus
And then we can enable NetworkManager:
ln -s /etc/sv/NetworkManager /var/service/
So, you can check the enabled services with:
ls -la /var/service
-
-l-> long listing format (shows details such as permissions, owner, group, size, and modification time) -
-a-> show all files, including hidden files beginning with "." (normally not the format of a service name)
It's also recommended to disable competing network managers such as dhcpcd or wpa_supplicant.
So, we just look if those are enabled:
ls -l /var/service |
grep -E 'dhcpcd|wpa_supplicant|wicd|NetworkManager|dbus'
If dhcpcd is enabled and you have decided to use NetworkManager, disable its service link:
unlink /var/service/dhcpcd
Likewise, only if a standalone wpa_supplicant service link is present:
unlink /var/service/wpa_supplicant
Now, just scan the Wi-Fi Access Point:
nmcli device wifi list
And connect:
nmcli device wifi connect 'SSID_NAME OR BSSID' password 'WIFI_PASSWORD'
Detect CPU manufacturer
grep -m1 vendor_id /proc/cpuinfo
The -m1 is here to tell to show just the first result.
-m11 would show the at most the 11 first lines containing the pattern we searched for.
Possible results:
vendor_id : GenuineIntel
or:
vendor_id : AuthenticAMD
If this shows the first option:
xbps-install -S void-repo-nonfree
xbps-install -S intel-ucode
If this is an AMD CPU:
xbps-install -S linux-firmware-amd
CPU microcode is basically a tiny layer of firmware inside the processor that helps implement some CPU instructions and internal behaviors.
Not every instruction is literally executed as a single simple hardware action.
Some complex instructions or special CPU behaviors are internally broken down into smaller operations, and microcode helps control that.
The important part is that CPU vendors can publish microcode updates to fix CPU bugs, security issues, or errata without physically replacing the processor.
The microcode should be loaded very early in the boot phase because if the CPU had a bug and that we downloaded the fixing microcode, then we want the whole system to rely on the intermediate that fixes the bug, in this case the microcode.
Here are the initramfs generator used by major Linux distributions:
-
dracut-> Fedora/RHEL and several other distributions; Void commonly uses it too -
mkinitcpio-> traditionally Arch Linux -
initramfs-tools-> Debian and Ubuntu traditionally -
Booster-> another alternative, especially seen in Arch-related setups
They work is roughly:
kernel modules
firmware
storage drivers
filesystem drivers
LVM/RAID/crypto tools
microcode-related early boot data
|
V
dracut
|
V
/boot/initramfs-....img
Back to our Void install, we can either run manually the dracut command:
dracut --force
That rebuilds the initramfs for the currently running kernel.
Without explicitly specifying a kernel version, using dracut during an installation can be confusing because the running kernel belongs to the live environment, not necessarily to the newly installed Void system.
So, if you want to target a specific kernel version (the one installed for the system), you can do:
sudo dracut --force /boot/initramfs-6.12.XX_1.img 6.12.XX_1
where the last argument is the exact chosen kernel version as shown by:
ls /lib/modules
or for the running kernel:
uname -r
But in the installing process, for Void, it's better to trust the linux kernel version we have just installed previously (may not be the same as the one in the live environment).
So you can query it with the xbps-query -l command that lists the installed packages and grep it out the linux package.
xbps-query -l | grep '^ii linux[0-9]'
Suppose it shows:
linux6.12
Then force that kernel package’s reconfiguration:
xbps-reconfigure -f linux6.12
The xbps-reconfigure command will rerun the configuration script of the targeted package.
In this case this will trigger the associated dracut script, therefore regenerating the initramfs.
Or you can do the more general command that will rerun the configuration script for all installed package:
xbps-reconfigure -fa
Now, when we ls /boot, we see:
/boot/vmlinuz-6.x.y_1
/boot/initramfs-6.x.y_1.img
/boot/intel-ucode.img # or amd version
Or Arch, the version does not appear in the filenames:
/boot/vmlinuz-linux
/boot/initramfs-linux.img
/boot/intel-ucode.img
Installing the GRUB
Now install the only GRUB EFI executable that is strictly necessary for this design:
grub-install \
--target=x86_64-efi \
--efi-directory=/boot/efi \
--bootloader-id=Void \
--removable \
--no-nvram \
--recheck
The generated fallback executable is:
/boot/efi/EFI/BOOT/BOOTX64.EFI
One grub-install, executed from Void, is sufficient:
ESP:/EFI/BOOT/BOOTX64.EFI
|
V
Void’s GRUB
|
V
Void:/boot/grub/grub.cfg
|
V
either Void kernel or Arch kernel
Installing an additional: EFI/Arch/grubx64.efi is optional. It would provide Arch with its own independent EFI loader, but the main direct-loading design does not require it.
Because grub-install is executed from the Void chroot:
/ -> /dev/sdb2
/boot->/dev/sdb2:/boot
GRUB is installed with its prefix associated with Void’s GRUB directory:
/dev/sdb2:/boot/grub
Thus:
BOOTX64.EFI
|
V
GRUB finds its prefix
|
V
/dev/sdb2:/boot/grub/grub.cfg
But GRUB does not directly read:
/etc/grub.d/40_custom
at boot.
Instead:
/etc/grub.d/40_custom
|
V
read by grub-mkconfig
|
V
content copied into /boot/grub/grub.cfg
|
V
grub.cfg is read at boot
Therefore, after installing GRUB, we have to generate its configuration:
grub-mkconfig -o /boot/grub/grub.cfg
Or, on Void, the convenience command is commonly:
update-grub
which regenerates the same configuration
At this initial moment, Arch is not be installed yet, so the menu will initially contain only Void.
Finishing Void installation
We now exit the chroot environment with exit.
Then we make sure all the writes has been applied to /dev/sdb2 and /dev/sdb1 with sync.
And we finally recursively unmount the partitions:
umount -R /mnt
Installing Arch
Now, we'll install Arch on /dev/sdb3 and add some configurations into the grub on void /dev/sdb2 to make the grub able to see not only Void but also Arch.
So, from the live Arch live environment, we mount the partition where it'll be installed:
mount /dev/sdb3 /mnt
And create the required structure:
mkdir -p /mnt/boot/efi
mount /dev/sdb1 /mnt/boot/efi
Even though we do not need to install Arch’s own GRUB, mounting the ESP lets Arch record it in /etc/fstab with genfstab -U /mnt > /mnt/etc/fstab, you can do it now btw.
Now, we install the base Arch packages into its environment, that's the equivalent Arch command for the Void XBPS_ARCH step:
pacstrap -K /mnt \
base \
linux \
linux-firmware \
sudo \
networkmanager
chroot into Arch
Now, we can chroot into Arch.
Either with the manual mount with --rbind and after the with the --make-rslave or with the Arch native arch-chroot that does it for us.
So:
arch-chroot /mnt
Configuring timezone
As we did for Void, we configure the timezone by making /etc/localtime point to the appropriate file from the system timezone database.
For Paris:
ln -sf /usr/share/zoneinfo/Europe/Paris /etc/localtime
We can verify the final target with:
readlink -f /etc/localtime
which should return:
/usr/share/zoneinfo/Europe/Paris
We also synchronize the hardware clock with the current Linux system clock like before in the Void installation:
hwclock --systohc
Configuring the locale
Arch, like our Void glibc installation, uses glibc impl, so locale data has to be generated.
First open:
/etc/locale.gen
and uncomment the locales you want.
For example:
fr_FR.UTF-8 UTF-8
en_US.UTF-8 UTF-8
Then generate them:
locale-gen
Now choose the default locale used by the system.
For example:
printf '%s\n' 'LANG=fr_FR.UTF-8' > /etc/locale.conf
Keyboard layout
Arch uses /etc/vconsole.conf for the virtual-console keyboard layout.
For a French keyboard:
printf '%s\n' 'KEYMAP=fr' > /etc/vconsole.conf
This concerns the Linux virtual console.
A graphical environment such as X11 or Wayland can have its own keyboard configuration later.
Hostname
We now give the machine a hostname.
For example:
printf '%s\n' 'arch-me' > /etc/hostname
Then we can configure /etc/hosts:
127.0.0.1 localhost
::1 localhost
127.0.1.1 arch-me.localdomain arch-me
Again, modifying /etc/hostname while inside the chroot configures the installed Arch system, it does not change the hostname currently used by the Arch live environment.
Setting the root password
Set the password of the root account:
passwd
Same thing as before:
New password:
Retype new password:
Creating a normal user
Now we create a normal user account.
For example:
useradd -m -G wheel -s /bin/bash juju
A reminder of the parameters:
-
-mcreates /home/juju -
-Gwheel adds the user to the supplementary wheel group -
-s/bin/bash sets Bash as the login shell
juju is the account name
Then set its password:
passwd juju
We can verify the user's identity and groups with:
id juju
Configuring sudo
We already installed sudo with pacstrap.
As with Void, Arch commonly uses the wheel group for users that should be allowed to run commands through sudo.
We should edit /etc/sudoers through:
visudo
and enable:
%wheel ALL=(ALL:ALL) ALL
Using visudo rather than directly editing /etc/sudoers is preferable because it validates the syntax before saving an invalid configuration.
We can verify the resulting file afterward with:
visudo -c
Configuring networking
During pacstrap, we installed:
networkmanager
The package installs the program, but installing a service does not mean that it will automatically start during boot.
Arch uses systemd, not runit like Void uses, so we enable NetworkManager with:
systemctl enable NetworkManager
This creates the appropriate links so systemd starts NetworkManager during future boots.
Microcode, again
For Intel:
pacman -S intel-ucode
For AMD:
pacman -S amd-ucode
Then we use the Arch linux preset defined in /etc/mkinitcpio.d/linux.preset, which is provided by the linux package, to regenerate the corresponding initramfs image with mkinitcpio:
mkinitcpio -p linux
The preset file is only a configuration file telling mkinitcpio which kernel and initramfs images to build; the initramfs itself is the generated image stored under /boot.
Exiting Arch environment
We do the same thing we did for the Void step:
exit
sync
umount -R /mnt
Now, we are on the Arch live environment.
grub final configuraton
Now, we mount Void somewhere that does not conflict with /mnt:
mkdir -p /mnt-void
mount /dev/sdb2 /mnt-void
We now enter Void environment using arch-chroot:
arch-chroot /mnt-void
We now have to get the UUID of the Arch filesystem and store it into a variable to:
ARCH_UUID=$(blkid -s UUID -o value /dev/sdb3)
-
-s UUID-> query only the UUID tag -
-o value-> choose the output format, here only print the raw value
So for example, without -o value:
blkid -s UUID /dev/sdb3
you might get:
/dev/sdb3: UUID="5a04b4c7-6a4b-4f4b-b20f-8444590776e4"
With:
blkid -s UUID -o value /dev/sdb3
you get only:
5a04b4c7-6a4b-4f4b-b20f-8444590776e4
The flag name is a bit not consistent with lsblk:
-
lsblk -o ...-> selects which field(s) to display -
blkid -s ...-> selects which field(s) to display -
blkid -o ...-> selects how the result is formatted
Back to the grub conf modification.
We now write this into /etc/grub.d/40_custom:
menuentry "Arch Linux" {
insmod part_gpt
insmod ext2
search --no-floppy --fs-uuid --set=root ARCH_UUID
linux /boot/vmlinuz-linux root=UUID=ARCH_UUID rw
initrd /boot/intel-ucode.img /boot/initramfs-linux.img
}
For AMD, change the final line to:
initrd /boot/amd-ucode.img /boot/initramfs-linux.img
And replace the ARCH_UUID with its value:
sed -i "s/ARCH_UUID/$ARCH_UUID" /etc/grub.d/40_custom
Then regenerate Void’s principal menu:
grub-mkconfig -o /boot/grub/grub.cfg
And validate the synthax:
grub-script-check /boot/grub/grub.cfg
Final architecture
Only one grub-install was required:
Executed from Void
|
V
ESP:/EFI/BOOT/BOOTX64.EFI created
|
V
associated with Void:/boot/grub
But grub-mkconfig is run again after installing Arch and adding its menu entry:
Void:/etc/grub.d/40_custom
|
V
grub-mkconfig
|
V
Void:/boot/grub/grub.cfg
The final boot sequence is:
UEFI firmware
|
V
/dev/sdb1:/EFI/BOOT/BOOTX64.EFI
|
V
Void’s GRUB executable
|
V
/dev/sdb2:/boot/grub/grub.cfg
|
V
menu
|-- Void Linux
|-- Arch Linux
Hope you found this article usefull, see you later !