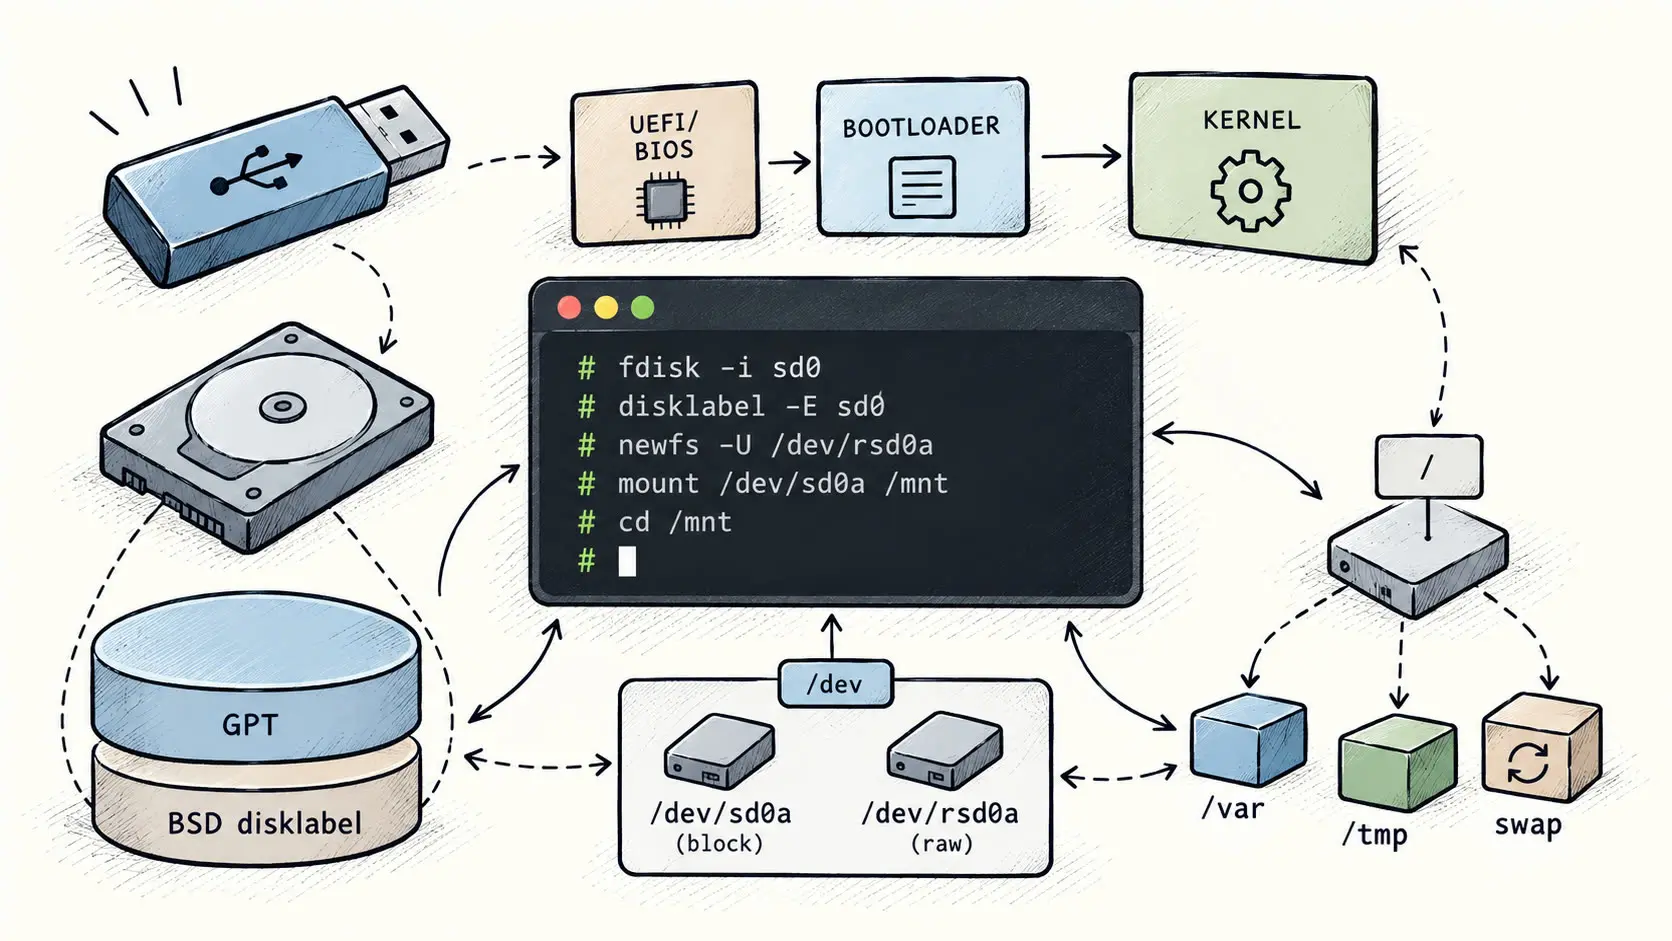
In this article, we'll go through the manual installation of OpenBSD and see the differences and similarities with Linux.
The setup
We'll directly download the latest image of OpenBSD, at the time the version 7.9 and copy it to a USB stick, you can also use Ventoy if you want.
In Linux, we have the dd command to copy the entirety of an image to an external disk.
sudo dd if=install79.img of=/dev/sdX bs=4M status=progress conv=fsync
Replace /dev/sdX by the name of your usb-stick, you can see it with lsblk or sudo fdisk -l.
Booting
After putting the usb stick to the PC you want to install OpenBSD to, choose to boot from this USB stick on its BIOS.
Now, you'll be prompted the following:
Welcome to the OpenBSD/amd64 7.9 installation program.
(I)nstall, (U)pgrade, (A)utoinstall or (S)hell?
Here, we'll go for the manual installation, so press "S".
Now, you are in the small RAM-environment (live environment).
An important Linux difference: no initramfs
This is worth understanding immediately.
On Linux, a typical boot chain looks approximately like:
firmware
|
V
GRUB/systemd-boot
|
V
Linux kernel
|
V
initramfs
|
V
find/mount real root filesystem
|
V
switch_root
|
V
PID 1
The initramfs may be generated with:
-
mkinitcpio -
dracut -
update-initramfs
OpenBSD's normal installed system does not use this model.
The normal boot path is closer to:
firmware
|
V
OpenBSD bootloader
|
V
/bsd
|
V
kernel mounts root filesystem
|
V
/sbin/init
|
V
/etc/rc <- this is the main system startup script (we'll see later)
Therefore, we have:
-
Linux -> kernel + separately generated
initramfs -
OpenBSD -> normal kernel
/bsdcan boot the installed system directly
Disk identification
In linux, we have lsblk, on BSD we have sysctl hw.disknames.
In fact we just inspect the value of the kernel parameter containing the disknames (in the hw namespace).
In fact here's a part of the hw namespace:
hw
|-- machine
|-- model
|-- ncpu
|-- physmem
|-- disknames
|-- ...
This will show something like:
hw.disknames=wd0:...,sd0:...,sd1:...
This is very similar to Linux:
sysctl kernel.hostname
sysctl net.ipv4.ip_forward
where:
kernel.hostname and net.ipv4.ip_forward
are also hierarchical kernel parameters.
You can also inspect the boot messages:
dmesg
Which is also present in Linux.
Typical OpenBSD naming:
-
wd0-> SATA/ATA disk on certain controllers -
sd0-> SCSI-like disk, including many USB/SATA/NVMe devices -
cd0-> optical drive
SCSI is a command protocol/language, not a specific piece of hardware anymore.
Because it's decoupled from the physical transport, many different technologies (USB, SATA via translation, network storage like iSCSI, virtual disks in VMs, Fibre Channel) can all "speak SCSI" to the OS.
This gives modularity because the OS kernel only needs one SCSI driver stack to handle many different underlying hardware types, the hardware specifics are abstracted away.
What's going on in /dev
The kernel may know about sd1 while the installer RAM disk does not yet contain its partitions:
/dev/sd1a
/dev/sd1b
...
In that case, you need to manually populate /dev for the required partition:
cd /dev
sh MAKEDEV sd1
This creates the required device nodes.
OpenBSD's own disk documentation explicitly mentions doing this from bsd.rd (the specific kernel the live environment uses) when additional disk devices are needed.
It creates the possible device nodes for that disk according to OpenBSD's device naming scheme.
So after running MAKEDEV, we may get nodes like:
/dev/sd1a
/dev/sd1b
/dev/sd1c
...
/dev/sd1p
/dev/rsd1a
/dev/rsd1b
...
even if the USB stick actually contains only one real filesystem partition.
Those nodes are just entry points into the kernel device driver. Their existence does not mean that all those partitions really exist.
The r literally means raw.
The block device:
/dev/sd1a
is the normal interface used to mount filesystems, for example:
mount /dev/sd1a /mnt
The raw device:
/dev/rsd1a
is used by low-level tools that want direct access to the partition, such as:
newfs /dev/rsd1a
fsck /dev/rsd1a
We can see the type difference with:
ls -l /dev/sd1a /dev/rsd1a
We’ll get something structurally like:
brw------- ... /dev/sd1a
crw------- ... /dev/rsd1a
where:
-
b-> block device -
c-> character device
This gives us an interesting comparison:
Linux
kernel discovers device
|
V
devtmpfs + udev normally populate /dev underneath
OpenBSD installation environment
kernel discovers device
|
V
MAKEDEV may be needed for missing nodes
Wait, what ? There's 2 partitioning levels ?
On Linux you are accustomed to something like:
physical disk
|
GPT
|-- /dev/sda1 EFI
|-- /dev/sda2 Linux root
|-- /dev/sda3 Linux home
Each GPT partition can directly contain a filesystem.
On OpenBSD/amd64 there are commonly two layers:
physical disk
|-- GPT
|-- EFI System Partition
|-- OpenBSD GPT partition
|-- BSD disklabel
|-- a /
|-- b swap
|-- d /tmp
|-- e /var
|-- ...
We explicitly distinguish:
-
fdiskpartitions -> the tool OpenBSD uses to inspect GPT partitions -
disklabelpartitions -> the ones that normally contain the actual OpenBSD filesystems (see later).
So do not mentally equate:
Linux -> /dev/sda2
with:
OpenBSD -> /dev/wd0a
They exist at different conceptual layers.
The disklabel letters
OpenBSD disklabels have partitions:
a b c d e f g h i j k l m n o p
Some letters have conventional meanings.
Most importantly:
-
a-> root filesystem on the boot disk -
b-> usually swap -
c-> entire physical disk
OpenBSD documents c specifically as the partition representing the entire disk.
And yess, c isn't an ordinary filesystem partition, it overlaps other partitions because of its semantic nature.
It exists mainly as a special whole-disk view.
It is not meant to hold a normal filesystem. Its purpose is to give OpenBSD a device name that refers to the entire physical disk, including all partitions and metadata.
That whole-disk view is useful for low-level tools that need access to sectors outside any individual filesystem partition, for example partitioning tools, bootloader tools, disk imaging, or reading disk metadata.
Create the outer disk partition
We'll use the fdisk shell on the targeted disk (here named wd0), so:
fdisk -e wd0
Now we enter its shell:
wd0:1> reinit gpt
This initializes a new GPT layout in memory, including the protective MBR.
GPT stores its primary GPT header at LBA (Logical Block Adressing) 1, followed by the GPT partition-entry array starting in subsequent LBAs
So GPT disks usually place a tiny "fake" MBR in sector 0.
That protective MBR normally contains one partition entry of type 0xEE covering essentially the whole disk.
Its purpose is compatibility with old MBR-only software.
Without it, an old program that knows nothing about GPT might inspect sector 0, see “no MBR partitions,” and conclude that the disk is empty and potentially overwrite it.
With the protective MBR, that old program instead sees roughly:
MBR:
partition 0: type EE
occupies whole disk
so it is much less likely to treat the disk as unused.
Nothing is written to disk yet until you use write or quit.
The on-disk GPT structure is roughly:
LBA 0
|-- protective MBR
LBA 1
|-- primary GPT header
LBA 2 ...
|-- GPT partition-entry array
... usable disk space ...
near end of disk
|-- backup GPT partition-entry array
last LBA
|-- backup GPT header
Back to partitioning.
Now create/edit one GPT entry for the ESP:
wd0*:1> edit 0
( The "*" in the shell means that there is at least one change that has not been written, at this point that's just the reinit gpt. )
and give it:
type: EFI System
offset: 1m
size: 512m
fdisk accepts b, k, m, g, and t units
Then create the OpenBSD GPT partition:
wd0*:1> edit 1
with something like:
type: OpenBSD
offset: 513m
size: *
Instead of setting 513m for example, you can use the next aligned offset computed by fdisk.
You'd see something like:
Partition offset [1050624]:
and just press:
Enter
That accepts the proposed sector offset.
Also, the special size:
*
means to use the remainder of the available disk.
Then inspect:
wd0*:1> print
and finally:
wd0*:1> write
wd0:1> exit
Creating the disklabel
We will use disklabel in interactive mode.
Run:
disklabel -E wd0
The -E means interactive editing, you'll enter its REPL.
This is the closest conceptual equivalent to using parted again, but now we are operating on the BSD disklabel, not on the MBR/GPT table.
disklabel does not blindly assume the entire physical disk is available.
The kernel already knows the outer GPT layout. It knows:
wd0
|-- foreign GPT region: EFI
|-- OpenBSD GPT region
and the OpenBSD disklabel is constrained to the OpenBSD area.
We'll create something like:
wd0a /
wd0b swap
wd0d /tmp
wd0e /var
wd0f /usr
wd0g /usr/X11R6
wd0h /usr/local
wd0i /home
-
wd0a-> The root filesystem. It is the top of the entire filesystem hierarchy and contains the essential directories needed to boot and operate the system, such as/etc,/bin,/sbin,/dev, and the mount points for the other filesystems. -
wd0b-> Disk space reserved for virtual memory. The kernel may move inactive memory pages from RAM to swap when needed. It is not a filesystem and therefore has no mount point. -
wd0d-> Temporary files created by programs and users. These files are generally not expected to be permanent. Keeping/tmpseparate also allows restrictive mount options such asnodevornosuid, and prevents temporary files from filling the root filesystem.
Indeed, /tmp is writable by ordinary users, so it is a good place to apply extra restrictions in the /etc/fstab file (see later).
nodev means:
device files on this filesystem are ignored as devices
On Unix, special files can represent devices, for example:
/dev/null
/dev/tty
/dev/sd0a
These are not ordinary files; their inode type tells the kernel to route accesses to a device driver.
If a filesystem is mounted with the nodev option (set in the /etc/fstab file).
Then even if someone somehow creates a block or character device node inside it, for example:
/tmp/fake-device
The kernel will not treat it as an actual device.
This is useful on filesystems like:
/tmp
/home
because users have no legitimate reason to create usable device nodes there.
Now, nosuid is about the set-user-ID and set-group-ID permission bits.
Normally, an executable can have the setuid bit:
-rwsr-xr-x
You recognize the octals (first its owner, second for the group it belongs to and the third one for the others).
The first character isn't therefore a permission bit but rather a bit indicating the filesystem object this is.
Common first characters are:
- regular file
d directory
l symbolic link
c character device # like a keyboard (stream of bytes)
b block device # like a storage device such as /dev/sda1 -> can be accessed at an arbitrary position
p FIFO / named pipe
s socket
Back to the setuid, if owned by root, running it (as others) can cause the process to execute with the owner's effective UID rather than the caller's UID.
We therefore make the assumption that the file is executable by "others".
Conceptually:
normal executable:
julien runs program
-> process runs as julien
setuid-root executable:
julien runs program
-> process may run with effective UID root
This mechanism is used legitimately by some Unix programs that need limited privileged operations, like one programm that should not be the owner of a file but need to run its programm that needs to run with root UID, so the permissions associated to this owner.
At this point, you guessed it, in the octal permission bits representation, the setuid bits is not x (which only means executable), but is s.
We have:
x = executable
s = executable + setuid
S = setuid, but NOT executable
The setgid bits is exactly the same concept of setuid but applied for the groups.
When an executable with setgid is run, the process gets the effective group ID of the file’s group.
This is why Unix permissions can actually be written with four octal digits, not just three.
You already know:
755
as:
7 5 5
| | |
| | |- others
| |--- group
|----- owner
But the full representation can be:
4755
where the first digit is for the special bits:
4 = setuid
2 = setgid
1 = sticky
The sticky permission bit is mainly used for directories.
On Linux or BSD we often see the /tmp folder use this permission bit:
ls -ld /tmp
Output:
here
|
V
drwxrwxrwt 19 root root 135168 sept. 5 14:45 /tmp
/tmp is a shared directory used by many different users and programs. Those processes must be able to create their own temporary files there, so /tmp is normally writable and searchable by everyone.
However, we still want separation between users and programs. Program A should not be able to delete or rename a file belonging to program B merely because both can write to /tmp.
This is what the sticky permission bit is for. On a sticky directory, users can still create and manage their own files, but they cannot normally delete or rename files owned by other users.
On a filesystem mounted with nosuid, the kernel ignores the setuid and setgid bits.
So even if someone places:
/tmp/something
with the setuid bit set, executing it from /tmp will not grant the elevated identity.
-
wd0e-> Variable system data: logs, mail queues, spool data, caches, databases used by system services, temporary runtime state that persists longer than/tmp, and other data whose size changes while the machine is running. -
wd0f-> A large part of the installed base system: userland programs, libraries, headers, documentation... -
wd0g-> OpenBSD's X Window System files:X11binaries, libraries, configuration/support files, and other components belonging to the base X system. Keeping it separate reflects the fact thatX11is a distinct part of the OpenBSD base-system sets. -
wd0h-> Software installed outside the OpenBSD base system, especially third-party packages installed withpkg_add(see later). This separation is very important conceptually:
-
/usr-> OpenBSD base system -
/usr/local-> third-party/local software
wd0i-> Users' personal home directories and files
Notice that there is no filesystem on wd0c.
Again:
wd0c = whole disk
not:
wd0c = third normal partition
But this is does guarantee that those letters would be free to use, because when we did create the ESP GPT partition, a wd0X (where X is a letter) could have been reserved as the ESP partition, so please inspect the disklabel partitions at this point with:
disklabel wd0
And you might see something like:
i: ... MSDOS
That is actually quite common. But the letter is not inherently fixed to i.
Therefore, you must not blindly follow the following commands and adapt the partitions name in the disklabel REPL commands.
So, when you enter the disklabel REPL, you’ll be prompted something similar to:
Label editor (enter '?' for help at any prompt)
wd0>
The most important commands are:
-
p-> Print the current disklabel -
a-> Add a partition -
d-> Delete a partition -
m-> Modify an existing partition -
w-> Write the disklabel to disk -
q-> Quit
So a manual session could look like this:
Add root / :
wd0> a a
You’ll be prompted for things like:
offset: [default]
size: 4G
FS type: 4.2BSD
mount point: /
the value:
4.2BSD
is the traditional disklabel type meaning:
"this partition is intended to contain a BSD Fast File System"
It does not mean that you are literally using the filesystem from BSD 4.2.
The name is historical.
OpenBSD's native filesystem lineage comes from the Berkeley Fast File System, introduced around the 4.2BSD era, so the disklabel type name remained:
4.2BSD
Then later as you'll see, you actually create the filesystem with:
newfs wd0a
Now, swap:
wd0> a b
For example:
offset: [default]
size: 4G
FS type: swap
swap has no mount point because it is not mounted into the filesystem tree at all.
A normal filesystem partition is attached somewhere under /.
But swap is just a pool of disk space the kernel can use as virtual memory backing. There is no directory like /swap where you browse files.
Then /tmp:
wd0> a d
offset: [default]
size: 4G
FS type: 4.2BSD
mount point: /tmp
Then /var:
wd0> a e
offset: [default]
size: 8G
FS type: 4.2BSD
mount point: /var
Then /usr:
wd0> a f
offset: [default]
size: 25G
FS type: 4.2BSD
mount point: /usr
Then /usr/X11R6:
wd0> a g
offset: [default]
size: 15G
FS type: 4.2BSD
mount point: /usr/X11R6
Then /usr/local:
wd0> a h
offset: [default]
size: 10G
FS type: 4.2BSD
mount point: /usr/local
Then /home with the remaining space:
wd0> a i
You can now write changes with w and quit with q.
Creating the filesystems
After the disklabel step we have partition metadata, but the partitions that are marked 4.2BSD are still empty raw regions until we run newfs.
On Linux we would do that for example (no newfs command):
mkfs.ext4 /dev/sda2
The newfs command create an OpenBSD FFS filesystem on the targeted partition.
So we run the following:
newfs wd0a
newfs wd0d
newfs wd0e
newfs wd0f
newfs wd0g
newfs wd0h
newfs wd0i
But remember to adapt the letters to your actual layout.
When we do for example:
newfs wd0a
the kernel layer resolves wd0a to disk wd0, disklabel partition a which is, as we saw, directly set on the OpenBSD outer (GPT) partition.
Now, we need to correctly format to FAT 32 the ESP partition so the firmware can read it.
In this example, we make the assumption that the ESP partition has reserved the name wd0p.
Therefore, we apply the following:
newfs_msdos -F 32 /dev/rwd0p
And yess, newfs_msdos is the Linux equivalent of mkfs.fat command.
Mounting
First, we have to mount root:
mount /dev/wd0a /mnt
And then, create mountpoint directories:
mkdir -p /mnt/tmp
mkdir -p /mnt/var
mkdir -p /mnt/usr
mkdir -p /mnt/usr/X11R6
mkdir -p /mnt/usr/local
mkdir -p /mnt/home
Then mount the sources:
mount /dev/wd0d /mnt/tmp
mount /dev/wd0e /mnt/var
mount /dev/wd0f /mnt/usr
mount /dev/wd0g /mnt/usr/X11R6
mount /dev/wd0h /mnt/usr/local
mount /dev/wd0i /mnt/home
Unlike Linux, we don't need to mount /proc, /sys, /dev, and /run using Linux-style recursive bind mounts.
OpenBSD simply has a different runtime architecture.
In particular, there is no Linux-style:
mount --rbind /dev /mnt/dev
mount --rbind /proc /mnt/proc
mount --rbind /sys /mnt/sys
mount --rbind /run /mnt/run
Configuring the Wi-Fi
If you are directly plugged with a Ethernet cable, you can skip this part.
Before configuring Wi-Fi, we first need to identify which network interfaces OpenBSD detected.
A simple way is:
ifconfig
or, for a more concise view:
ifconfig -a
On our machine, OpenBSD exposed interfaces including:
em0
wpi0
lo0
The important one was:
wpi0
wpi0 was the wireless interface.
OpenBSD interface names are usually derived from the kernel driver name. So unlike Linux, where you may see names such as:
wlp3s0
enp2s0
OpenBSD often gives you names like:
em0
wpi0
iwm0
ath0
re0
The prefix tells you which driver is managing the device.
In our case:
wpi0
means:
wpi driver
+
interface instance 0
You can now inspect the dmesg messages and grep those who contain wpi to potentially see the model name of the Wi-Fi antenna:
dmesg | grep wpi
Now, on many installation the kernel successfully detects the interfaces but may fail to interact with tem with ifconfig for example.
In my case, I tried to do:
ifconfig wpi0 up
And OpenBSD returned an error similar to:
wpi0: error: 2, could not read firmware wpi-3945abg
wpi0: could not read firmware
That meant that the antenna firmware was missing.
The driver is kernel code that knows how to communicate with the hardware.
The firmware is code that must be uploaded into the Wi-Fi chipset itself before the device can operate.
On an already installed OpenBSD system with Internet access, firmware is normally managed with:
fw_update
But here we had a circular problem:
we need Internet
|
V
to download the Wi-Fi firmware
But
we need the Wi-Fi firmware
|
V
to get Internet
Then, on another machine, we downloaded the OpenBSD firmware package containing:
wpi-3945abg
We extracted it and copied the firmware file onto a second USB stick.
Back inside the installer shell, we then plugged that USB stick into the laptop.
To see the disks detected by OpenBSD, we checked the famous kernel variable:
sysctl hw.disknames
For example:
hw.disknames=wd0:...,...,sd2:...
In our case:
-
wd0= internal Kingston SSD -
sd1= installer USB stick -
sd2= second USB stick containing the firmware
So the output of the last command looks like:
hw.disknames=wd0:...,sd1:...,sd2:...
If /dev/sd2* nodes are missing, then we need:
cd /dev
sh MAKEDEV sd2
Now, we have to indentify the filesystem partition of the USB stick we've just plugged:
disklabel sd2
We see an entry like:
i: ... MSDOS
So the FAT partition containing our files was exposed as sd2i, so we mount it and copy the firmware.
mkdir /mnt2
mount /dev/sd2i /mnt2
cp /mnt2/wpi-3945abg /etc/firmware/
Now that the firmware is finally available we can finally do:
ifconfig wpi0 up
without any error.
By the way Linux ifconfig and the BSD variant have the same UNIX ancestry but have a different implementation and they differ in term of capabilities.
The BSD variant can do much more including scanning for Access Point (AP), setting interfaces down or up, connecting to AP, configure the IPv4 etcetera.
For instance here a non-exhaustive list of its commands:
ifconfig wpi0 up
ifconfig wpi0 scan
ifconfig wpi0 join "SSID" wpakey "..."
ifconfig wpi0 inet autoconf
So, now, we scan for Wi-Fi AP using this interface.
ifconfig wpi0 scan
Which can output something like:
nwid "iPhone" chan 6 bssid aa:bb:cc:dd:ee:ff ...
Here:
nwid "iPhone"
is the SSID, the network name, and:
bssid aa:bb:cc:dd:ee:ff
is the MAC address of that specific access point (unique identifier).
And then, we connect:
ifconfig wpi0 join "SSID" wpakey "password"
At this point we have connected our interface to the AP, but the configuration is not yet done (we must require an IPv4 address given by the IP).
So we request the configuration:
ifconfig wpi0 inet autoconf
At that point OpenBSD can use its networking daemons to obtain:
-
IPv4 address
-
default route
-
DNS configuration
through the network provided by the AP.
Finally, you can use the Internet, have you heard about it ?
Verify by a simple ping:
ping julienlargetpiet.tech
Persistent conf lives in /etc/hostname.wpi0.
This file will be read by netstart at boot which will invoke ifconfig for connecting the interface.
So you can write one for the interface, it must contain the following:
join "SSID" wpakey "YOUR_PASSWORD"
inet autoconf
inet6 autoconf
On linux, this part is handled by ip link and after iw or NetworkManager (nmcli client) for Wi-Fi.
Installing base system
We need to download base packages called sets.
For that, we create the /tmp/sets dir on the live system and download them into:
mkdir /tmp/sets
cd /tmp/sets
The URL of the sets is https://cdn.openbsd.org/pub/OpenBSD/7.9/amd64/.
We can download them by using the ftp tool which also undertstand HTTPS URLs:
/tmp/sets/ > ftp https://cdn.openbsd.org/pub/OpenBSD/7.9/amd64/SHA256.sig
/tmp/sets/ > ftp https://cdn.openbsd.org/pub/OpenBSD/7.9/amd64/bsd
/tmp/sets/ > ftp https://cdn.openbsd.org/pub/OpenBSD/7.9/amd64/bsd.mp
/tmp/sets/ > ftp https://cdn.openbsd.org/pub/OpenBSD/7.9/amd64/bsd.rd
/tmp/sets/ > ftp https://cdn.openbsd.org/pub/OpenBSD/7.9/amd64/base79.tgz
/tmp/sets/ > ftp https://cdn.openbsd.org/pub/OpenBSD/7.9/amd64/comp79.tgz
/tmp/sets/ > ftp https://cdn.openbsd.org/pub/OpenBSD/7.9/amd64/man79.tgz
/tmp/sets/ > ftp https://cdn.openbsd.org/pub/OpenBSD/7.9/amd64/game79.tgz
/tmp/sets/ > ftp https://cdn.openbsd.org/pub/OpenBSD/7.9/amd64/xbase79.tgz
/tmp/sets/ > ftp https://cdn.openbsd.org/pub/OpenBSD/7.9/amd64/xfont79.tgz
/tmp/sets/ > ftp https://cdn.openbsd.org/pub/OpenBSD/7.9/amd64/xserv79.tgz
/tmp/sets/ > ftp https://cdn.openbsd.org/pub/OpenBSD/7.9/amd64/xshare79.tgz
Now we have to verify what we downloaded, to ensure that it was not corrupted or maliciously modified.
For that verification, we trust the OpenBSD 7.9 public release key stored in:
/etc/signify/openbsd-79-base.pub
The release checksum manifest contains the expected SHA-256 hashes of the OpenBSD sets. However, verifying the downloaded files against those hashes alone would not be sufficient, because an attacker could theoretically modify both the sets and the checksum manifest.
Therefore, the checksum manifest is itself digitally signed by OpenBSD.
signify uses the trusted public key to verify that this signature was produced by the corresponding OpenBSD private key.
If the signature is valid, the checksum manifest is authenticated. We can then compare the SHA-256 hashes of the downloaded sets against the authenticated hashes in the manifest.
We use asymmetric encryption here.
For asymmetric encryption, if Alice wants only Bob to read message M:
Alice takes Bob's public key
|
V
encrypts M
|
V
ciphertext C
|
V
Bob uses Bob's private key
|
V
recovers M
For a digital signature (our case), the goal is different: Bob wants to know that the message really came from Alice and was not modified.
So Alice does:
M
|
V
hash(M)
|
V
sign hash with PrivateA
|
V
signature S
Then Bob receives:
M + S
and uses Alice’s public key to verify:
Verify(PublicA, M, S)
-> valid / invalid
Here, Alice is the trusted third party and as user (wanting to install openBSD we are Bob).
This is analogous to what package managers normally hide behind repository signing.
On Linux:
pacman
apt
xbps
perform repository/package trust checks for you.
So, we run:
signify -C \
-p /etc/signify/openbsd-79-base.pub \
-x SHA256.sig
-C first verifies the signed checksum list, then checks the files against those authenticated checksums.
The key is /etc/signify/openbsd-79-base.pub (argument of the -p flag).
SHA256.sig is the file containing all the files to download and their signed checksum.
Kernel installation
Back to installation.
With OpenBSD, the kernels are located into the root /.
So, we need to copy the kernel into /.
There are 3 special kernels.
-
bsd.rd-> installer / ramdisk / recovery kernel -
bsd.sp-> kernel for single-processor machines -
bsd.mp-> kernel for multiprocessor machines
The system will use whatever kernel is named bsd.
So if your CPU has more than one thread, I advise to use bsd.mp, then do the following:
/tmp/sets > cp bsd.mp /mnt/bsd
/tmp/sets > cp bsd /mnt/bsd.sp
/tmp/sets > cp bsd.rd /mnt/bsd.rd
Extracting the base system
Now comes the OpenBSD equivalent of:
-
pacstrap-> Arch Linux family -
xbps-install-> Void Linux -
debootstrap-> Debian family
except the system is fundamentally shipped as sets.
Extract them into /mnt (root of the installed system):
tar -C /mnt -xzphf base79.tgz
tar -C /mnt -xzphf comp79.tgz
tar -C /mnt -xzphf man79.tgz
tar -C /mnt -xzphf game79.tgz
tar -C /mnt -xzphf xbase79.tgz
tar -C /mnt -xzphf xfont79.tgz
tar -C /mnt -xzphf xserv79.tgz
tar -C /mnt -xzphf xshare79.tgz
The flags are worth understanding:
-
-C /mnt-> change extraction destination to /mnt -
-x-> extract -
-z-> gzip compressed archive -
-p-> preserve permissions -
-h-> follow symlinks where applicable -
-f-> archive filename follows
This extraction step (specifically the base79.tgz) gives us /mnt/dev/MAKEDEV.
At this point, we can use disklabel to automatically generate the /mnt/etc/fstab file that the kernel will read to correctly mount all the partitions with the correct options:
disklabel -E -F /mnt/etc/fstab wd0
And then directly q.
For example, it may generate something structurally like:
0123456789abcdef.a / ffs rw 1 1
0123456789abcdef.d /tmp ffs rw,nodev,nosuid 1 2
0123456789abcdef.e /var ffs rw,nodev,nosuid 1 2
0123456789abcdef.f /usr ffs rw,nodev 1 2
0123456789abcdef.g /usr/X11R6 ffs rw,nodev 1 2
0123456789abcdef.h /usr/local ffs rw,nodev 1 2
0123456789abcdef.i /home ffs rw,nodev,nosuid 1 2
So, we'll do exactly what we did in the live system before, meaning generating the user-space accessible device nodes such as:
/mnt/dev/console
/mnt/dev/null
/mnt/dev/tty
/mnt/dev/wd0a
/mnt/dev/rwd0a
Therefore, we do the following:
cd /mnt/dev
sh MAKEDEV all
Configuring the hostname
OpenBSD uses:
/etc/myname
For example:
echo 'open-bsd' > /mnt/etc/myname
This differs from Linux distributions where you commonly have:
/etc/hostname
Configuring the mirror
We just write the source URL of the package manager into /mnt/etc/installurl:
echo 'https://cdn.openbsd.org/pub/OpenBSD' > /mnt/etc/installurl
/etc/installurl is the standard file containing the OpenBSD mirror base URL and is subsequently used by tools such as pkg_add, syspatch, and sysupgrade.
This has roughly the role of repository configuration such as:
-
/etc/pacman.d/mirrorlist-> Arch family -
/etc/xbps.d/-> Void family -
/etc/apt/sources.list-> Debian family
Timezone
This is exactly the same step as Linux, I'm based in Paris so I do:
ln -sf /usr/share/zoneinfo/Europe/Paris /mnt/etc/localtime
and not:
ln -sf /mnt/usr/share/zoneinfo/Europe/Paris /mnt/etc/localtime
Indeed, the destination must be under /mnt because that's where you're creating the installed system's symlink; the source argument is the path information stored in that symlink.
Password
In Linux we have /etc/passwd and /etc/shadow.
The first is the one storing informations about all users on the system, like its UID, primary GID, shell etcetera but, funny enough, not the password.
Indeed that's a file applications have access to in order to obtain informations about a user.
A record in this file can look like this:
juju:x:1000:1000:juju,,,:/home/juju:/bin/bash
This has 7 colon-separated fields:
name : passwd : UID : GID : GECOS : home : shell
In this case:
juju
|
|-- username = juju
|-- password field = x
|-- UID = 1000
|-- primary GID = 1000
|-- GECOS/comment = juju,,,
|-- home = /home/juju
|-- login shell = /bin/bash
And look at the permission bits of this file, we see that others can read it:
ls -l /etc/passwd
Output:
-rw-r--r-- 1 root root 3154 avril 29 12:52 /etc/passwd
This is the equivalent of OpenBSD /etc/passwd.
The actual password hash is moved into:
/etc/shadow
Which is readable only by privileged processes.
A typical /etc/shadow line looks more like:
juju:$y$...:20700:0:99999:7:::
with fields roughly for:
-
username
-
password hash
-
last password change
-
minimum password age
-
maximum password age
-
warning period
-
inactivity period
-
account expiration
-
reserved
reserved currently has no standard operational meaning in normal Linux account management. It exists so the format can potentially be extended later without changing the number/layout of fields in an incompatible way.
This file is the equivalent of the OpenBSD /etc/master.passwd.
/etc/master.passwd also has a special BSD field called class (for login class).
It refers to an OpenBSD login class defined through /etc/login.conf (given by base79.tgz); login classes can control things like authentication methods, resource limits, and session environment.
In OpenBSD we also have compiled versions of /etc/passwd and /etc/master.passwd, respectively named /etc/pwd.db and /etc/spwd.db.
They are compile in a special binary format to allow performant queries for programs, more performant than a CSV type serialization.
So now we just must ensure that /mnt/etc/master.passwd exists.
Then use OpenBSD's password-database tools against the target tree.
For example, to rebuild the target databases from its /etc/master.passwd, OpenBSD provides:
pwd_mkdb -p -d /mnt /etc/master.passwd
-d /mnt tells pwd_mkdb to operate relative to /mnt, and -p also creates the legacy /etc/passwd file. It also produces /etc/pwd.db and /etc/spwd.db inside the target system.
Then, we chroot into the target system:
chroot /mnt /bin/ksh
and inside:
passwd root
sets the root password.
We can also add normal user, for example:
useradd -m -G wheel -s /bin/ksh juju
passwd juju
And because in OpenBSD we don't use sudo but doas, here the file to configure group permission isn't /etc/sudoers but /etc/doas.conf.
So we'll just write in it the following:
permit :wheel
Make it writable and readable by owner:
chmod 600 /etc/doas.conf
The owner is us and we are root, remind that we've just chroot into this system while being root on the live system.
And validate its synthax with:
doas -C /etc/doas.conf
Now we just exit.
exit
/etc/rc
On OpenBSD we don't have systemctl.
Indeed, we have rcctl.
For example, to activate ssh, we do:
rcctl enable sshd
rcctl start sshd
Your custom services will be located inside /etc/rc.d.
A minimal custom daemon wrapper looks like this:
#!/bin/ksh
daemon="/usr/local/bin/mydaemon"
. /etc/rc.d/rc.subr
rc_cmd $1
Note that we source /etc/rc.d/rc.subr.
After sourcing it, your script gains functions and logic such as the machinery used to:
start
stop
restart
reload
check
/etc/rc.d/rc.subr comes from base79.tgz.
Save it as:
/etc/rc.d/mydaemon
then make it executable:
chmod +x /etc/rc.d/mydaemon
Enable it at boot with:
rcctl enable mydaemon
Start it:
rcctl start mydaemon
Check it:
rcctl check mydaemon
Stop it:
rcctl stop mydaemon
Back to the daemon script:
rc_cmd $1
uses the rc.subr machinery.
For example, if we run:
/etc/rc.d/mydaemon start
then:
$1
is:
start
so effectively:
rc_cmd start
is called.
rc_cmd then knows, thanks to rc.subr, how to use the variable:
daemon="/usr/local/bin/mydaemon"
to start the daemon.
Without:
. /etc/rc.d/rc.subr
the shell would not know what rc_cmd means and effectively:
rc_cmd: not found
Then, we note that the rcctl command mydaemon effectively forward command to mydaemon.
We can say it's the same as:
/etc/rc.d/mydaemon command
For our own OpenBSD daemon, its output location depends of the daemon itself.
If our daemon just does:
print("hello")
then that goes to stdout. OpenBSD’s rc system does not automatically collect stdout/stderr into a centralized journal like systemd-journald does.
So for a service, the normal OpenBSD approach is usually to have the daemon log through syslog.
For Python, you can do something like:
import syslog
syslog.openlog("mydaemon")
syslog.syslog(syslog.LOG_INFO, "mydaemon started")
Then syslogd receives it, and depending on /etc/syslog.conf, we usually find it in something like:
/var/log/daemon
or possibly:
/var/log/messages
We can search:
grep mydaemon /var/log/daemon
Installing the bootloader
On Linux, we have grub-install, on BSD we have installboot.
Here, we do not use GRUB.
We just run:
installboot -v -c -r /mnt wd0
-
-v-> Verbose mode -
-c-> configure firmware sowd0(or whichever disk provided as positional argument toinstallboot) becomes the preferred boot disk -
-r /mnt-> use/mntas the root of the system being installed -
wd0-> disk onto which the OpenBSD bootstrap is installed
The output should look like:
using /mnt as root
installing bootstrap on wd0
using default bootstrap files for amd64
...
For BIOS booting, OpenBSD uses two bootstrap stages.
The first stage is:
/usr/mdec/biosboot
This is the primary bootstrap. installboot installs it into the boot area of the disk or OpenBSD partition.
Its job is mainly to locate and load the second-stage bootstrap:
/boot
The /boot program is the secondary/system bootstrap. Its main purpose is to locate and load the OpenBSD kernel, which is normally:
/bsd
So the BIOS boot chain is conceptually:
BIOS
|
V
biosboot
(primary bootstrap)
|
V
/boot
(secondary/system bootstrap)
|
V
/bsd
(kernel)
The bootstrap files used by installboot are normally available under /usr/mdec. On amd64, the default primary bootstrap is /usr/mdec/biosboot and the default secondary bootstrap is /usr/mdec/boot.
Therefore, installboot does not generate those programs from templates. It configures the existing bootstrap programs so the first stage can locate the second stage, which can then load the kernel.
On UEFI systems, installboot installs the EFI bootstrap into the EFI System Partition. That EFI bootstrap is then used in the UEFI boot path leading to /bsd.
So in this case it just detects the ESP partition and writes its EFI bootloader file into it.
If we hadn't formated the ESP partition, then we could have run this command just before:
installboot -p wd0
It would have prepare the filesystem on the partition reserved for the bootloader (the one with the type: "EFI System").
Now, what about being able to boot others systems on the same machine ?
On Linux, UEFI NVRAM boot entries are commonly managed explicitly with efibootmgr.
On OpenBSD, the installation-specific equivalent is integrated into installboot: on amd64/arm64 UEFI+GPT systems, installboot -c configures the machine to boot from the specified disk by default (here wd0 as written before).
The UEFI menu on the PC can still see the others system (specifically the others UEFI executable) and give the oportunity to boot them, but the default option is in this case the installed OpenBSD system.
Finishing the install
Finally, we can unmount /mnt and reboot on this disk (we'll remove the usb stick).
sync
umount /mnt/usr/X11R6
umount /mnt/usr/local
umount /mnt/usr
umount /mnt/home
umount /mnt/var
umount /mnt/tmp
umount /mnt
reboot
Conclusion
Hope this article was useful, see you later ;)